|
|
Post by Romy Ocon on Jul 26, 2009 0:21:45 GMT
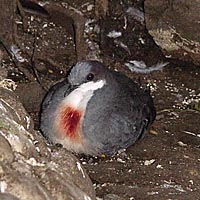
Today, I finally got my sweet revenge on this unposted old capture.  Let me explain..... Let me explain.....Many PBPF birdnuts had a feast shooting this handsome fellow at UP-Diliman nearly two years ago. It was seen first by Plain Idol, and it stayed long enough to be admired and photographed extensively. IIRC, even Trinket and Adri were able to catch up and got to see this dashing flycatcher. Unfortunately, even if it obliged us by staying around so long, the bird just wouldn't perch on a photogenic branch with a nice, clean BG. And this frustrated me no end. So I decided this morning to just blast away the busy environment by desaturating it to oblivion. ;D Narcissus Flycatcher ( Ficedula narcissina, male) UP-DILIMAN, QUEZON CITY, October 17, 2007, 40D + 500 f4 L IS + Canon 1.4x TC, 1/80 sec, f/7.1, ISO 320, Manfrotto 475B tripod/3421 gimbal head Everything in the photo that's not part of the bird was simply desaturated in PS  |
|
|
|
Post by Elvin Sansona on Jul 26, 2009 1:24:54 GMT
What an artwork...very beautiful!
|
|
|
|
Post by Eric Patdu on Jul 26, 2009 3:43:50 GMT
Wow! This must have taken a lot of time to separate the subject from the background.
Though orange in color, this reminds me of the little girl in red in Schindler's List. She's the only one in color while the rest was in monochrome.
|
|
|
|
Post by Romy Ocon on Jul 26, 2009 3:52:00 GMT
Thanks for looking, Elvin and Eric! Wow! This must have taken a lot of time to separate the subject from the background. Though orange in color, this reminds me of the little girl in red in Schindler's List. She's the only one in color while the rest was in monochrome. The process is easy but laborious: 1. I processed the photo as a regular full color one (levels, contrast, sharpening, etc.). 2. Then I made two layers in addition to the original layer. 3. I desaturated the middle layer then tweaked the levels/contrast further to taste. 4. On the top layer, I erased everything that doesn't look like part of the bird to expose the monochrome middle layer. This is a tedious process, and it probably took me half an hour to clean up the edges. 5. Flatten everything and save as jpeg.  |
|
|
|
Post by Neon Rosell II on Jul 26, 2009 6:48:27 GMT
4. On the top layer, I erased everything that doesn't look like part of the bird to expose the monochrome middle layer. This is a tedious process, and it probably took me half an hour to clean up the edges Ka Mastah, 1. I'll do it this way, I'll use "quick selection tool" it will be a lot faster than erasing. You can adjust the brush size for small areas like the toes. If the selection goes beyond, just click on the "-" brush to fine tune the selection. 2. After selection is finished make another layer. On the top layer, I'll click on layer mask. This will separate the bird and will show the bottom BG. 3. Click on the bottom layer to work on the BG. You can still play around but this is another way of separating subject and BG where you can process them differently. ;D |
|
|
|
Post by Elvin Sansona on Jul 26, 2009 7:59:02 GMT
|
|
|
|
Post by Romy Ocon on Jul 26, 2009 9:25:40 GMT
4. On the top layer, I erased everything that doesn't look like part of the bird to expose the monochrome middle layer. This is a tedious process, and it probably took me half an hour to clean up the edges Ka Mastah, 1. I'll do it this way, I'll use "quick selection tool" it will be a lot faster than erasing. You can adjust the brush size for small areas like the toes. If the selection goes beyond, just click on the "-" brush to fine tune the selection. 2. After selection is finished make another layer. On the top layer, I'll click on layer mask. This will separate the bird and will show the bottom BG. 3. Click on the bottom layer to work on the BG. You can still play around but this is another way of separating subject and BG where you can process them differently. ;D I didn't detail the erasure process, but I actually do it very similar to your method, Neon. 1. Erase quickly around the bird using a big brush, leaving a thin area between the path of the big brush and the bird. 2. Use magic wand to select the remaining thin area, using varying tolerances that's appropriate to local colors. Once the thin area is selected, add some feathering and erase everything in it. 3. Touch up on the border areas with a small eraser brush of varying opacity and feathering. |
|
|
|
Post by Ely Teehankee on Jul 26, 2009 12:04:03 GMT
Wow Forum's top photographers discussing matter that mortals like me can't understand. Maybe, in due time. What a beautiful bird and picture. Well done Romy. Mabuhay.
|
|
|
|
Post by Toto Gamboa on Jul 27, 2009 16:36:14 GMT
Coool! |
|