|
|
Post by Romy Ocon on Apr 3, 2009 0:58:05 GMT
(Moving this old thread here to set up an example for the new Digital Art board  ____________________________________ These were captured at San Juan, Batangas last November and I've posted them individually before. While playing with DPP 3.6, I decided to assemble the burst of 4 shots into a composite, using the original background of the second shot. The 1Dinosaur2 may be an old brick, but may asim pa ang AF! ;D Asian Golden-Plover ( Pluvialis fulva) SAN JUAN, BATANGAS, 1DM2 + 500 f4 IS + Canon 1.4x TC, 700 mm, f/7.1, ISO 400, 1/1600 sec, manual exposure, 475B/3421 support, composite from a burst of 4, using the background of the second shot: 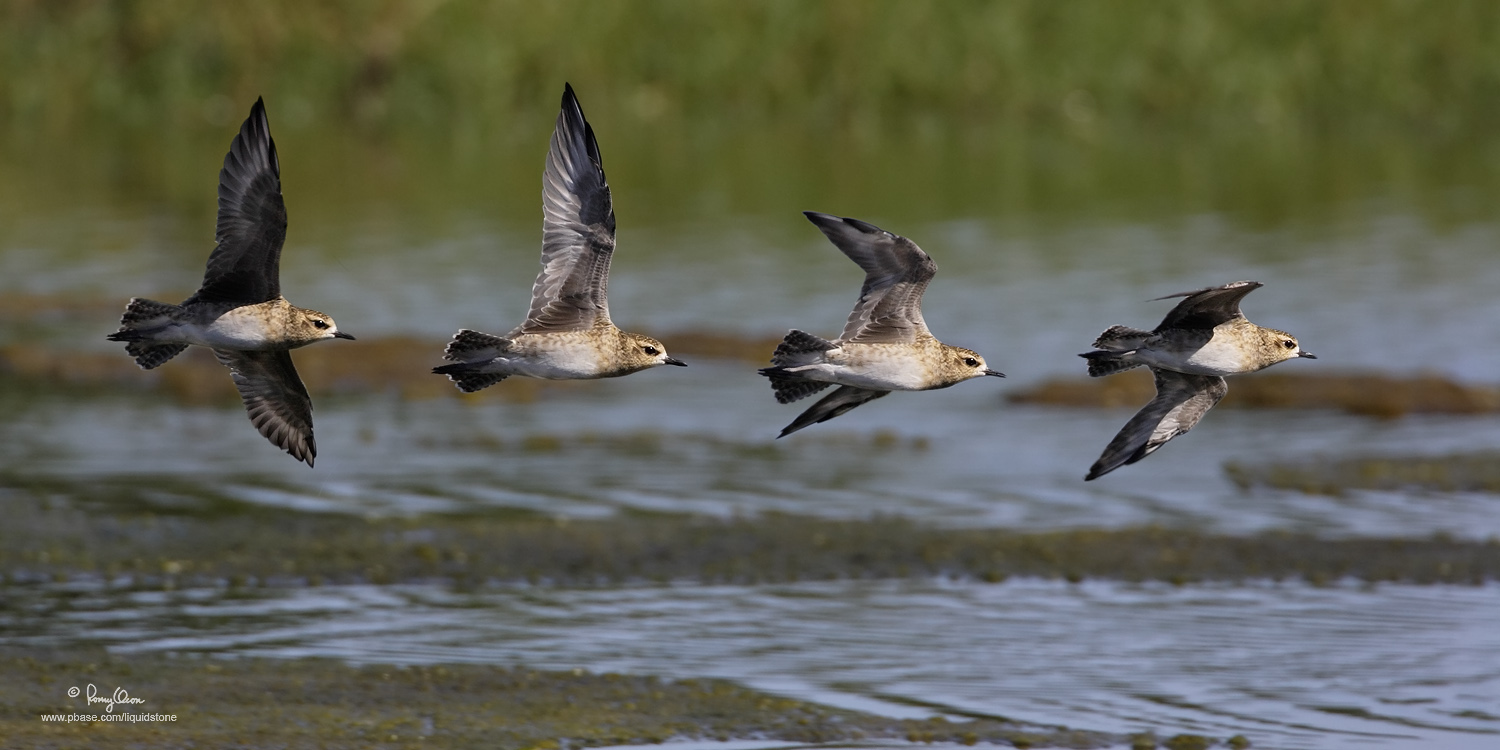
|
|
|
|
Post by Jun Gregorio on Apr 3, 2009 1:03:10 GMT
WoW! Holy sharpness Romy. Very impressive!
|
|
|
|
Post by Teddy Regpala on Apr 3, 2009 1:03:34 GMT
That's really NEAT Roms.
Looks like it's a 1Diamond2 to me! ;D
(it lasts forever)
|
|
|
|
Post by ppaaoolloo on Apr 3, 2009 1:57:09 GMT
How do you do this Romy?
|
|
|
|
Post by Romy Ocon on Apr 3, 2009 2:22:16 GMT
Thanks, guys. ;D Which one Paolo, the capture or the PP work?  |
|
|
|
Post by ppaaoolloo on Apr 3, 2009 2:38:30 GMT
Thanks, guys. ;D Which one Paolo, the capture or the PP work? PP work. Galing kasi. ;D |
|
|
|
Post by Romy Ocon on Apr 3, 2009 2:56:49 GMT
Thanks, guys. ;D Which one Paolo, the capture or the PP work? PP work. Galing kasi. ;D Hehe.... it's a very simple, albeit laborious, operation in PS. 1. Convert the RAW captures, make sure you use the same conversion parameters (particularly WB) so the look/colors of the bird will be consistent. 2. In PS, paste the captures over the photo which you've chosen as the BG. Then erase the BG of each photo (except the BG photo), removing everything that doesn't look like part of the bird. You can use the magic wand to select which part you wish to erase. You should also use the appropriate feathering on the selection so the edges of each bird will blend naturally with the BG. 3. Reposition each bird so the motion vector appears smooth. 4. Flatten all layers, then do your various PS adjustments to taste (sharpening/contrast/levels, etc). It took me about 30 minutes to process the 4 photos into this composite. ;D |
|
|
|
Post by Jun Gregorio on Apr 3, 2009 4:50:01 GMT
Hehe.... it's a very simple, albeit laborious, operation in PS. 1. Convert the RAW captures, make sure you use the same conversion parameters (particularly WB) so the look/colors of the bird will be consistent. 2. In PS, paste the captures over the photo which you've chosen as the BG. Then erase the BG of each photo (except the BG photo), removing everything that doesn't look like part of the bird. You can use the magic wand to select which part you wish to erase. You should also use the appropriate feathering on the selection so the edges of each bird will blend naturally with the BG. 3. Reposition each bird so the motion vector appears smooth. 4. Flatten all layers, then do your various PS adjustments to taste (sharpening/contrast/levels, etc). It took me about 30 minutes to process the 4 photos into this composite. ;D hmm since you mentioned you were playing around with DPP. It has that pano look so I assume you've used some form of a "photostich" program. I've played with similar shots of my niece running and has a fairly good results. I think I'll use the same photo and use your workflow to see if I get better results. Thanks for sharing your " laborious, operation in PS" |
|
|
|
Post by Romy Ocon on Apr 3, 2009 8:37:53 GMT
Hehe.... it's a very simple, albeit laborious, operation in PS. 1. Convert the RAW captures, make sure you use the same conversion parameters (particularly WB) so the look/colors of the bird will be consistent. 2. In PS, paste the captures over the photo which you've chosen as the BG. Then erase the BG of each photo (except the BG photo), removing everything that doesn't look like part of the bird. You can use the magic wand to select which part you wish to erase. You should also use the appropriate feathering on the selection so the edges of each bird will blend naturally with the BG. 3. Reposition each bird so the motion vector appears smooth. 4. Flatten all layers, then do your various PS adjustments to taste (sharpening/contrast/levels, etc). It took me about 30 minutes to process the 4 photos into this composite. ;D hmm since you mentioned you were playing around with DPP. It has that pano look so I assume you've used some form of a "photostich" program. I've played with similar shots of my niece running and has a fairly good results. I think I'll use the same photo and use your workflow to see if I get better results. Thanks for sharing your " laborious, operation in PS" No stitching of the BG on this one, Jun. The bird was small in the frame, and there's room enough to fit in 3 other birds within the same frame. I actually had to crop the 8 MP frame to get a 1:2 pano aspect ratio. |
|
|
|
Post by Elvin Sansona on Jul 26, 2009 8:03:35 GMT
Its like taken in one setting! Very impressive Mastah!
|
|
|
|
Post by Neon Rosell II on Jul 26, 2009 9:44:22 GMT
Wow!!  haven't seen this before!! awesome burst the clarity and sharpness of all 4 shots are the same!! |
|


 , AFS 18-135mm f/3.5-5.6G , TC 1.4EII, TC 1.7EII, SB-800, Manfrotto 190CXPro3/393(3421), RRS BH-55, Kirk NC300 lens collar

 haven't seen this before!! awesome burst the clarity and sharpness of all 4 shots are the same!!